Beacon4
From Hackstrich
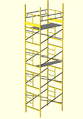
Beacon4 will be the fourth incarnation of the flagpole beacon (after Beacon2 and Beacon3), for Burning Man 2012. This year the plan is to take a different approach, and light the entire scaffold tower rather than just a beacon on top of the flagpole.
Contents
Project Status
- 2012-06-24: LED strips all obtained. Lighting design continues, as does firmware development.
- 2012-06-17: Hardware bring-up and firmware writing continuing. Lightjams is almost certainly going to be the software of choice. Lighting design is coming along.
- 2012-06-07: Work on StrichLux continues. Evaluated lots of software, Lightjams is looking the best at this point, though would require Windows.
- 2012-05-27: Completed rev. 1 StrichLux system design of all modules required for this project and sent all boards off for manufacturing.
- 2012-04-30: Started planning the power architecture for the project.
- 2012-04-29: Work continuing on IO-DMX module.
- 2012-04-24: Permission received!
- 2012-04-23: Requested permission from NeonBunny to attach LEDs to the tower.
- 2012-04-22: Started putting together idea.
Outstanding Issues
- Software evaluation:
- QLC
- Max of only 4 universes, which rules it out
- MagicQ
- Very complex and more geared toward theatre setups than VJ setups
- Supports up to 16 universes over Art-Net
- x86-only
- Advanced features like sound-reactiveness or remote control require a very expensive license dongle
- Lightjams
- x86/Windows-only
- Supports up to 16 universes over Art-Net
- File format is XML, so a lot of setup could be programmatically generated
- Sound reactiveness, remote control, Wiimote control, and everything else is included for a low price
- QLC
Ideas/Plans
- Main idea is to cover most of the scaffold tower in addressable LED strips, driven by multiple StrichLux modules
- Art-Net will be used between the controller and the StrichLux box
- Backup plan is to have a USB hub and one OpenDMX USB interface per universe, driving the StrichLux boxes via IO-DMX input modules
- Fit-PC 2i is being looked at to control the whole thing
- As nice as ARM would be power-wise, x86 will be much more flexible software-wise
- Need to make sure it will be powerful enough before we order
- Need to find a fanless very low power 4 or 5 port Ethernet switch
- Allied Telesis AT-FS705LE V5 might work, it's rugged, low power (1.5-2.5W), and cheap
- But it takes 7.5V which would be another regulator and is a potential point of failure that would bring the entire system down
- Alternative option is the GarrettCom S14H-Hi, it takes 8-15V in via screw terminals and is ruggedized, but $140 and draws 4W
- Best option may be the Sixnet SL-5ES-1, it's $100, rugged, takes 10-30VDC via screw terminals, and only draws 2W
- Allied Telesis AT-FS705LE V5 might work, it's rugged, low power (1.5-2.5W), and cheap
System Components
- Fit-PC 2i (controller)
- 4-port fanless Ethernet switch
- 3 StrichLux boxes (driver, each with:
- 60m of LED strips
- Power setup (need to work out power details)
- Debugging terminal (XO-1?)
Power Details
- Power requirements (peak)
- Fit-PC 2i - ???
- Ethernet Switch - ???
- StrichLux box(es) - ???
- LEDs - 10W/m (~1.8A/m at 5V measured, so 10W/m after losses is reasonable)
Power Architecture
http://www.asciiflow.com/#4007824742034929919/13747898[YOB-2]
                                                                              +--------------+
                                                                         +--->| LED Strip  0 |
                                                                         |    +--------------+
                                                                         |
                                                                         |    +--------------+
                                                       +---------------+ | +->| LED Strip  1 |
                                +--------------+       |               +-+ |  +--------------+
                                |              |       |   StrichLux   +---+
                                |     Dome     |    +->| Controller A  +---+  +--------------+
                                |   Lighting   |    |  |               +-+ +->| LED Strip  2 |
                                |              |    |  +---------------+ |    +--------------+
                                +--------------+    |                    |
                                        ^           |                    |    +--------------+
                                        |           |                    +--->| LED Strip  3 |
                             +----------+---------+ |                         +--------------+
                             |                    | |
                             |                    | |                         +--------------+
                             |                    +-+                    +--->| LED Strip  4 |
                             |                    |                      |    +--------------+
                             |                    |                      |
                             |                    |                      |    +--------------+
                             |                    |    +---------------+ | +->| LED Strip  5 |
    +---------------+        |                    |    |               +-+ |  +--------------+
    |               |        |    Distribution    |    |   StrichLux   +---+
    |    Battery    +=======>|                    +--->| Controller B  +---+  +--------------+
    |               |        |        Box         |    |               +-+ +->| LED Strip  6 |
    +---------------+        |                    |    +---------------+ |    +--------------+
                             |                    |                      |
                             |                    |                      |    +--------------+
                             |                    |                      +--->| LED Strip  7 |
                             |                    |                           +--------------+
                             |                    +-+
                             |                    | |                         +--------------+
                             +--+-------+---------+ |                    +--->| LED Strip  8 |
                                |       |           |                    |    +--------------+
                      +---------+       |           |                    |
                      v                 v           |                    |    +--------------+
              +--------------+   +--------------+   |  +---------------+ | +->| LED Strip  9 |
              |              |   |              |   |  |               +-+ |  +--------------+
              | Convienience |   |    System    |   |  |   StrichLux   +---+
              |   Outlets    |   |  Controller  |   +->| Controller C  +---+  +--------------+
              |              |   |              |      |               |   +->| LED Strip 10 |
              +--------------+   +--------------+      +---------------+      +--------------+
Lighting Layout
Random Notes
- Decided on 60m length total (3 StrichLux boxes)
- That's 1920 RGB LEDs and ~600W peak!
- Will need to come up with a lighting layout/design that will fit within this
Dimensions
Main Module (4 of these vertically, 2 of which will be lit)
-----------------------------------------------------------

+-----D-----+------E------+       |\                                   /|
|           |             |       |    \                           /    |
|-----D-----|             |       |        F                   /        |
|           H             |       |            \           /            |
|-----D-----|             |       |                \   /                |
|           |             |       |                /   \                |
|-----D-----+------E------|       |            /           \            |
|                         |       |        F                   \        |
A                         A       A    /                           \    A
|-----------B-------------+       |/                                   \|


Top Module
----------

|                         |       |                                     |
|                         |       |                                     |
|                         |       |                                     |
|                         |       |                                     |
|-------B-----------------|       |------------------C------------------|
|            |            |       |  /                               \  |
|            G            |       |------------------C------------------|
|            |            |       |                                     |
A============B============A       A                                     A
|                         |       |                                     |
- A - Module Height (5ft 1in)
- B - Module Width (5ft)
- C - Module Depth (7ft)
- D - Ladder Width (2.5ft)
- E - Beside-Ladder Width (B - D) (2.5ft)
- F - Cross-brace Length (7.37ft)
- G - Top Rail Support Height
- H - Ladder Section Height (3.5ft)
- n - Number of Modules (3)
- x - Number of Main Modules (2)
Idealized Layout
- Vertical Mains: A * 4 * n = 5.083 * 4 * 3 = 61ft (done piecing)
- Beside-Ladder Boxes: (E * 2 + H) * 2 * x = 34ft (done piecing)
- Cross-braces: F * 2 * 2 * x = 7 * 2 * 2 * 2 = 59ft (done piecing)
- Top Rail: B * 2 + C * 2 = 24ft (done piecing)
- Top-Middle Rail: C * 2 = 14ft (done piecing)
- Toe Board: B * 4 = 10ft (done piecing)
- Total: 202ft / 61.5m
Actual Layout
- Vertical Mains: 4.5m each * 4
- Cross brace tubes: 1.125m each * 8
- Toe board: 1.5m each * 2
- Top middle rail: 2.1m each * 2
- Top rail long side: 2.1m each * 2
- Top rail short side: 1.5m each * 2
- Ladder box vertical: 1m each * 4
- Ladder box horizontal: 0.75m * 8
- Total: 60.00m
LED Strip List
| Piece | Location | Length | # of LEDs | Reel | Controller/Channel | DMX Channels |
|---|---|---|---|---|---|---|
| Vertical Main 1 | Vertical Main 1 | 450cm | 144 | C | A-1 | 1-432 |
| Vertical Main 2 | Vertical Main 2 | 450cm | 144 | D | A-2 | 1-432 |
| Vertical Main 3 | Vertical Main 3 | 450cm | 144 | E | A-3 | 1-432 |
| Vertical Main 4 | Vertical Main 4 | 450cm | 144 | F | A-4 | 1-432 |
| Cross brace tube 1 | MF1/2 B Right | 218.75cm | 70 | G | B-1 | 1-210 |
| Cross brace tube 2 | MF1/2 A Right | 218.75cm | 70 | G | B-2 | 1-210 |
| Cross brace tube 3 | MF1/2 A Left | 218.75cm | 70 | H | B-3 | 1-210 |
| Cross brace tube 4 | MF1/2 B Left | 218.75cm | 70 | H | B-3 | 211-420 |
| Cross brace tube 5 | MF3/4 A Right | 218.75cm | 70 | I | C-1 | 1-210 |
| Cross brace tube 6 | MF3/4 B Right | 218.75cm | 70 | I | C-2 | 1-210 |
| Cross brace tube 7 | MF3/4 B Left | 218.75cm | 70 | J | C-3 | 1-210 |
| Cross brace tube 8 | MF3/4 A Left | 218.75cm | 70 | J | C-3 | 211-420 |
| Toe board 1 | 1 (Close) | 150cm | 48 | A | C-4 | 349-492 |
| Toe board 2 | 2 (Far) | 150cm | 48 | A | C-4 | 1-144 |
| Top middle rail 1 | Left | 212.5cm | 68 | K | C-4 | 145-348 |
| Top middle rail 2 | Right | 212.5cm | 68 | K | C-1 | 207-510 |
| Top long rail 1 | Right | 212.5cm | 68 | L | C-2 | 207-510 |
| Top long rail 2 | Left | 212.5cm | 68 | L | B-4 | 145-348 |
| Top short rail 1 | TF1 | 150cm | 48 | B | B-4 | 1-144 |
| Top short rail 2 | TF2 | 150cm | 48 | B | B-4 | 349-492 |
| Ladder box vertical 1 | MF1 | 100cm | 32 | A | B-1 | 283-378 |
| Ladder box vertical 2 | MF2 | 100cm | 32 | A | B-2 | 283-378 |
| Ladder box vertical 3 | MF3 | 100cm | 32 | B | C-1 | 211-306 |
| Ladder box vertical 4 | MF4 | 100cm | 32 | B | C-2 | 211-306 |
| Ladder box horizontal 1 | MF1 Top | 75cm | 24 | C, D | B-1 | 211-282 |
| Ladder box horizontal 2 | MF1 Bottom | 75cm | 24 | E, D | B-1 | 379-450 |
| Ladder box horizontal 3 | MB2 Top | 75cm | 24 | K | B-2 | 211-282 |
| Ladder box horizontal 4 | MF2 Bottom | 75cm | 24 | L | B-2 | 379-450 |
| Ladder box horizontal 5 | MF3 Top | 75cm | 24 | G, H | A-1 | 433-504 |
| Ladder box horizontal 6 | MF3 Bottom | 75cm | 24 | I, H | A-2 | 433-504 |
| Ladder box horizontal 7 | MF4 Top | 75cm | 24 | J, H | A-3 | 433-504 |
| Ladder box horizontal 8 | MF4 Bottom | 75cm | 24 | F, H | A-4 | 433-504 |
Reel Assignment
- Reel A (100% used)
- Toe Board 1: 150cm
- Toe Board 2: 150cm
- Ladder box vertical 1: 100cm
- Ladder box vertical 2: 100cm
- Reel B (100% used)
- Top short rail 1: 150cm
- Top short rail 2: 150cm
- Ladder box vertical 3: 100cm
- Ladder box vertical 4: 100cm
- Reel C (100% used)
- Vertical Main 1: 450cm
- Ladder box horizontal 1a: 50cm (chunk 1)
- Reel D (100% used)
- Vertical Main 2: 450cm
- Ladder box horizontal 1b: 25cm (chunk 2)
- Ladder box horizontal 2b: 25cm (chunk 2)
- Reel E (100% used)
- Vertical Main 3: 450cm
- Ladder box horizontal 2a: 50cm (chunk 1)
- Reel F (100% used)
- Vertical Main 4: 450cm
- Ladder box horizontal 8a: 50cm (chunk 1)
- Reel G (100% used)
- Cross brace tube 1: 218.75cm
- Cross brace tube 2: 218.75cm
- Ladder box horizontal 5a: 62.5cm (chunk 1)
- Reel H (100% used)
- Cross brace tube 3: 218.75cm
- Cross brace tube 4: 218.75cm
- Ladder box horizontal 5b: 12.5cm (chunk 2)
- Ladder box horizontal 6b: 12.5cm (chunk 2)
- Ladder box horizontal 7b: 12.5cm (chunk 2)
- Ladder box horizontal 8b: 25cm (chunk 2)
- Reel I (100% used)
- Cross brace tube 5: 218.75cm
- Cross brace tube 6: 218.75cm
- Ladder box horizontal 6a: 62.5cm (chunk 1)
- Reel J (100% used)
- Cross brace tube 7: 218.75cm
- Cross brace tube 8: 218.75cm
- Ladder box horizontal 7a: 62.5cm (chunk 1)
- Reel K (100% used)
- Top middle rail 1: 212.5cm
- Top middle rail 2: 212.5cm
- Ladder box horizontal 3: 75cm
- Reel L (100% used)
- Top long rail 1: 212.5cm
- Top long rail 2: 212.5cm
- Ladder box horizontal 4: 75cm
Cable Routing
- Overview
- When viewing the tower end-on with the ladder on the left:
- Vertical Main 1 is on the left of the close end
- Vertical Main 2 is on the right of the close end
- Vertical Main 3 is on the left of the far end
- Vertical Main 4 is on the right of the far end
- Main Frame 1 is the lower close frame of the 2 lit ones
- Main Frame 2 is the lower far frame of the 2 lit ones
- Main Frame 3 is the higher close frame of the 2 lit ones
- Main Frame 4 is the higher far frame of the 2 lit ones
- Top Frame 1 is the close top frame
- Top Frame 2 is the far top frame
- Cross Brace A are the tubes running low-to-high from MF1/3 to MF2/4
- Cross Brace B are the tubes running high-to-low from MF1/3 to MF2/4
- Toe Board 1 is the close board
- Toe Board 2 is the far board
- When viewing the tower end-on with the ladder on the left:
- Controller A
- Channel 1
- Feeder (up VM1) -> Vertical Main 1 -> Long Jumper (via TF1 Top Rail, down VM2) -> MF3 LBH Top
- Channel 2
- Feeder (up VM2) -> Vertical Main 2 -> Long Jumper (down VM2) -> MF3 LBH Bottom
- Channel 3
- Feeder (up VM3) -> Vertical Main 3 -> Long Jumper (via TF2 Top Short Rail, down VM4) -> MF4 LBH Top
- Channel 4
- Feeder (up VM4) -> Vertical Main 4 -> Long Jumper (down VM4) -> MF4 LBH Bottom
- Channel 1
- Controller B
- Channel 1
- Feeder (up VM4) -> CB MF1/2 B Right -> MF1 LBH Top -> MF1 LBV -> MF1 LBH Bottom
- Channel 2
- Feeder (up VM2) -> CB MF1/2 A Right -> MF2 LBH Top -> MF2 LBV -> MF2 LBH Bottom
- Channel 3
- Feeder (up VM1) -> CB MF1/2 A Left -> CB MF1/2 B Left
- Channel 4
- Feeder (up ???) -> TF1 Top Short Rail -> Left Top Long Rail -> TF2 Top Short Rail
- Channel 1
- Controller C
- Channel 1
- Feeder (up VM4) -> CB MF3/4 A Right -> Short Jumper -> MF3 LBV -> Long Jumper (via MF3 LBH Top, VM2) -> Right Top Middle Rail
- Channel 2
- Feeder (up VM2) -> CB MF 3/4 B Right -> Short Jumper -> MF4 LBV -> Long Jumper (via MF4 LBH Top, VM4) -> Right Top Long Rail
- Channel 3
- Feeder (up VM3) -> CB MF3/4 B Left -> CB MF 3/4 A Left
- Channel 4
- Feeder (up VM4) -> Toe Board 2 -> Left Top Middle Rail -> Toe Board 1
- Channel 1
StrichLux Enclosures
- Each StrichLux controller with its 4 output modules, 1 input module, and 1 power module will need an enclosure of some kind.
- Pelican case? Could do one larger one with all 3 controllers in it, or 3 smaller ones
- Assuming each StrichLux box has its own enclosure, would need a bunch of connections made through it:
- Power - 2x12V @ 20A each - 4 20A power pins
- Ethernet input - RJ45 - 1 RJ45
- Connec has plastic bayonet-style IP67 industrial Ethernet connectors which are somewhat reasonably priced, so far this looks like the best option even though it is a lot more expensive than regular non-weatherproof Ethernet
- Strip outputs - SPI+5V - 2 signal pins, 2 10A power pins each x 4
- JAE SRCN2A16-7S / SRCN6A16-7P would be good and extremely rugged, but the cost may be too high
- Molex MX150L will be used for inter-strip connections
- Reasonably priced
- Tooling is reasonably priced
- Matte sealed
- Want to be able to power the whole setup from AC power for configuration/testing/programming
- ATX power supplies provide plenty of +12V which could feed the PWR-DC5 modules
- A modular supply like the OCX ZT-series would be cleanest, could modify the cables with Sabre connectors on the ends
- Need 100W per channel, 200W per board, 600W total @ 12V
- 100W per channel @ 12V means 8.33A
- PCI-E and 8-pin CPU power connectors on ATX PSUs provide 6 amps per pin
- PCI-E connectors have 3 pin pairs each
- 8-pin CPU power connectors have 4 pin pairs each
- Need four pins per board
- Two boards get 8-pin CPU power -> Sabre connectors
- The last board gets a 2xPCI-E power -> Sabre connector
- OCZ ZT-series 750W power supply has all the required connectors
- ATX power supplies provide plenty of +12V which could feed the PWR-DC5 modules
Cost
| Item | Status | Cost |
|---|---|---|
| IO-DMX + IO-BO Rev. 1 PCBs | Obtained | $40.69 |
| IO-DMX + IO-BO Parts | Obtained | $18.31 |
| IO-SPI Rev. 1 PCBs | Obtained | $49.65 |
| CORE + IO-ETH + PWR-DC5 PCBs | Obtained | $454.66 |
| CORE + IO-SPI + IO-ETH + PWR-DC5 Parts | Obtained | $184.40 |
| Test LED Strip | Obtained | $25.00 |
| OCZ ZT 750W Test PSU | Obtained | $107.34 |
| 60m LPD8806 LED Strip | Obtained | $1320.00 |
| Fit-PC 2i | Future | ~$350.00 |
| Lightjams License | Future | $149.00 |
| Ethernet Switch | Future | ~$100.00 |
| 2 sets of StrichLux IO-CORE + IO-ETH + PWR-DC5 Parts | Future | ~$350.00 |
| Enclosures | Future | ??? |
| Enclosure Connectors | Future | ??? |
| Inter-Strip Connectors | Future | ??? |
| Total | Obtained | $2200.05 |
| Total | Future | ~$949.00 |
| Grand Total | ~$3149.05 |
Photos
Beacon4 Scaffold 3D Model