Difference between revisions of "HackLab.TO Bandwidth Display"
From Hackstrich
| Line 2: | Line 2: | ||
== Project Status == | == Project Status == | ||
| + | * 2014-04-15: Worked out a bunch of code bugs and found that the ethernet shield I was using was flaky. Finished software so it cycles between cable and DSL stats. Taped paper over the displays which makes them way more readable, need to get a proper sheet of acrylic or gel to put over them. | ||
* 2014-04-12: Finished assembling and programming all boards, no manufacturing defects like there were on the first run. Lasered up a back plate and mounted all the displays. Finished the protoshield with a 7805 to drive the display electronics, since the Arduino's regulator was overheating and shutting down doing so. Last step is to finish the software up to support two internet connections and get a red acrylic filter/gel to put over the displays to increase readability. | * 2014-04-12: Finished assembling and programming all boards, no manufacturing defects like there were on the first run. Lasered up a back plate and mounted all the displays. Finished the protoshield with a 7805 to drive the display electronics, since the Arduino's regulator was overheating and shutting down doing so. Last step is to finish the software up to support two internet connections and get a red acrylic filter/gel to put over the displays to increase readability. | ||
* 2014-04-08: Boards have arrived, 90% of assembly is done, just missing some resistors which I'll have to add another day. | * 2014-04-08: Boards have arrived, 90% of assembly is done, just missing some resistors which I'll have to add another day. | ||
Revision as of 00:04, 16 April 2014
The HackLab Bandwidth Display displays our current bandwidth usage on two 4 digit 7-segment displays.
Contents
Project Status
- 2014-04-15: Worked out a bunch of code bugs and found that the ethernet shield I was using was flaky. Finished software so it cycles between cable and DSL stats. Taped paper over the displays which makes them way more readable, need to get a proper sheet of acrylic or gel to put over them.
- 2014-04-12: Finished assembling and programming all boards, no manufacturing defects like there were on the first run. Lasered up a back plate and mounted all the displays. Finished the protoshield with a 7805 to drive the display electronics, since the Arduino's regulator was overheating and shutting down doing so. Last step is to finish the software up to support two internet connections and get a red acrylic filter/gel to put over the displays to increase readability.
- 2014-04-08: Boards have arrived, 90% of assembly is done, just missing some resistors which I'll have to add another day.
- 2014-03-10: Stuck digits ended up being a PCB manufacturing error that shorted some of the transistor bases to the ground plane. Worked around by point-to-point wiring those connections instead. Fixed many firmware bugs, wrote the software to drive this, works with two displays. Ordered 6 more boards w/ express shipping.
- 2013-07-26: Received PCBs, assembled first board. Programs OK, all segments work except F and the DP which are stuck on. Need to troubleshoot this more.
- 2013-06-28: Doh, thought this had been submitted but missed it. Submitted to OSH Park w/ express shipping.
- 2013-06-01: Decided that building all the digit boards on perfboard was going to be too much of a pain, designed/schematicized/laid out a dedicated control board for each digit, takes +5, +12, and I2C, and controls the digit. Will get 8 of these made to drive all the digits. Next step is reviewing the schematic/layout tomorrow before sending off to OSH Park.
- 2013-05-11: Built up shift register/transistors for cathode drives on a proto shield, mostly working. Built up most of the first digit except for the anode control transistor, also working. Tried to add the anode control, blew up the Arduino putting +12V into an I/O line. Next step is to redo the anode control stuff on the first digit and complete full testing of that before building the other 7 digit boards.
Hardware
- Arduino Uno
- Arduino Ethernet Shield
- Proto Shield w/ a connector that has that has +5, +12, and I2C to connect to the digits, plus a 7805 to drive the +5 rail for the displays
Notes
- 6 boards have ATmega168 MCUs, the other 2 have ATmega328p MCUs (Eric had a bunch of 168s to spare, so switched to that after prototyping)
- The 328p-based boards have "328" written on the back in the lower right corner and are otherwise identical
- Programming 168-based boards:
../../../tools/avr/bin/avrdude -c dragon_isp -P usb \
 -p m168 -e \
 -U hfuse:w:0xdd:m \
 -U lfuse:w:0xff:m \
 -U efuse:w:0x00:m \
 -U flash:w:ATmegaBOOT_168_diecimila.hex
- Programming 328p-based boards:
../../../tools/avr/bin/avrdude -c dragon_isp -P usb \
 -p m328p -e \
 -U hfuse:w:0xde:m \
 -U lfuse:w:0xff:m \
 -U efuse:w:0x05:m \
 -U flash:w:optiboot_atmega328.hex
Gallery
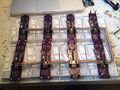
Bandwidth Display boards ready to program
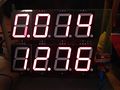
Bandwidth Display initial full working test
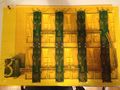
Bandwidth Display rear


